FAQ's for MyOIA
On our MyOIA Help page you can learn more about:
- Creating an account
- How to use multi-factor authentication
- How to resolve problems with your password
- How to submit a complaint form and track your complaint
If you need any further help, please contact us.
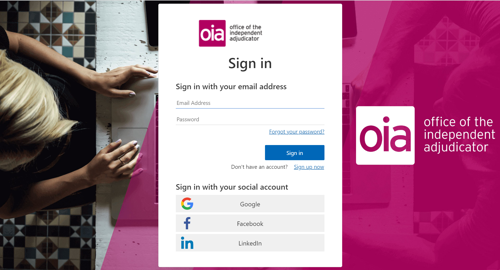
If you are a student you can choose to create a MyOIA account or log in with a social media account.
To create a MyOIA account click “Sign-up now” and follow the prompts on the screen. Once you have a username and password you will be prompted to set up muti-factor authentication to keep your account secure. (This step isn’t required when logging in with a social media account, as these already offer an additional layer of security.)
If you used our previous portal (prior to January 2023) we will have created an account for you when we launched the new MyOIA. To set this up click the “Forgot your password?” button and use the email address we hold for you.
We will create accounts for staff at providers who are new members of our Scheme. When the provider joins our Scheme you will receive an email with information on how to do this.
If you work at a provider that is already a member of our Scheme and you need access to MyOIA (but haven’t had an account before), you will need to get in touch with the Point of Contact [or Point of Contact Delegate] at your provider. They will be able to send you an invitation to create an account.
- It is not possible for a Point of Contact delegate to create their own account.
- The only way to successfully add an additional Point of Contact delegate to the MyOIA portal is for an existing Point of Contact, or Point of Contact delegate, to create them.
- We have seen many provider staff try and add themselves using the “Representative” account type. This account type is for Student Representatives only and will not allow access to provider data.
- Attempting to create your own account will lead to difficulties when the correct account type is being created.
Once you have confirmed your account details you will be prompted to set up multi-factor authentication. You will need to use an authenticator app to do this. Any authentication app should work and most are free to download. Apps that have been tested with our system include:
When you have downloaded the app you will need to use this to scan the QR code that appears when you sign into the portal. If you are signing in on a mobile, just choose the 'can’t scan' link, which will open up the authenticator app.
Then, when prompted during sign in, open the Authenticator app and enter the 6 digit code that appears into the MyOIA portal. You may have to do this more than once the first time you log into the MyOIA portal.
You won't have to authenticate again when remaining logged in and using the same device. You may be asked to authenticate when you next log in after logging out or are using a different device.
For any questions about this process please get in touch with us.
Or you can watch our video on multi-factor authentication.
Logging in
To log in to your MyOIA account, enter your email address and password, then follow the instructions for multi-factor authentication.
Logging out
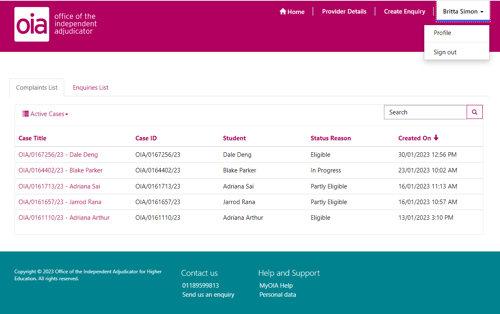
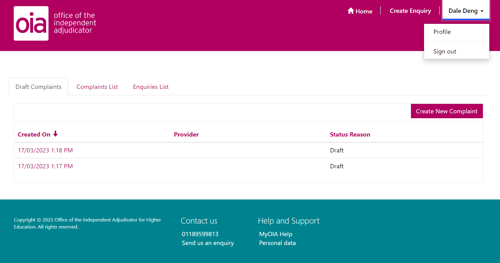
To log out, select “Sign out” from the drop-down menu that appears when you click your name in the top right-hand corner of the page.
Check that your password meets the requirements: it needs to be at least eight characters long and contain a lowercase letter, a capital letter, a number and a special character, such a !$%*^&@.
If you have forgotten your password, you can reset it by clicking “Forgot your password?” on the MyOIA login page.
If you are still having problems, please contact us.
Our guidance on personal information explains how we manage personal information and how long we keep MyOIA account information.
If you have already submitted a Complaint Form by email or post but do not have a MyOIA account you can create one by clicking on the “Forgot your password?” button and using the email address we hold for you (most likely the one you used to submit your complaint).
- Login to your MyOIA account
- Once you have logged in, select “Create New Complaint” on the right-hand side of the page
- Read the introduction and select “Start a new Complaint Form”
Each section expands to show you the information that we need. Questions and sections which you must answer, including the declaration, are clearly shown. We will not start reviewing your complaint until you submit your Complaint Form.
Your Complaint Form saves as you go along and you can come back to the form at any time during the next 90 days. If you decide not to submit your Complaint Form please contact us and we can delete it for you. We will delete draft Complaint Forms that have not been submitted after 90 days.
Once you submit your Complaint Form you will not be able to make any further changes to it from your MyOIA account. You will be able to see a read-only copy of your Complaint Form by logging in to your MyOIA account.
Once we have received your complaint, we will do some initial checks on your Complaint Form and send you an email with some information about what will happen next. If you have not received this email within three working days please check your spam or junk email folder, and then contact us.
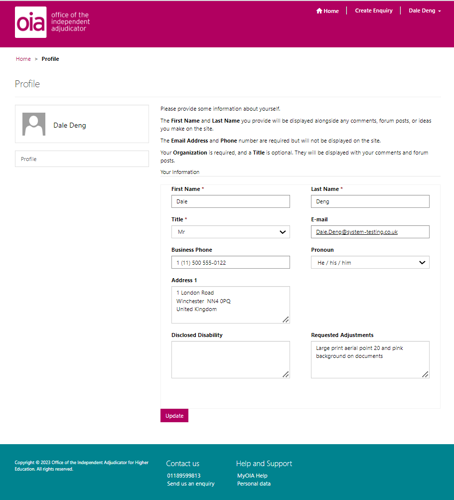
To change your contact details, the email address you use to log in or your password, log in to your MyOIA account. Select your name in the top right-hand corner of the page and select “Profile” from the drop-down menu.
- Edit the information you would like to change
- Select the “Update” button at the bottom of the page.
Track progress
From your home page you can see basic information about each complaint you have submitted. Your representative (if you have one) and the higher education provider will be able to see the same information.
- Log in to your MyOIA account
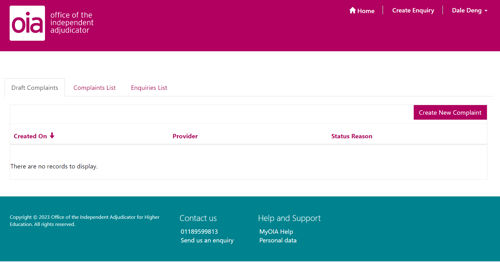
- To see draft complaints (which have not yet been submitted), select the “Draft Complaints” tab
- To see complaints that have been submitted, select the “Complaints List” tab. These will have an OIA reference number.
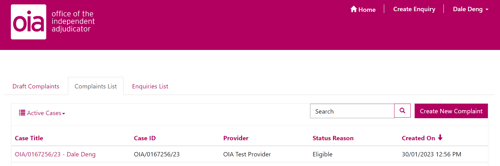
To see the full information about a complaint:
- Select the Case Title of the complaint you want to view
- In the Case Details you can see information relating to the complaint including its current status, as well as documents that have uploaded or requested
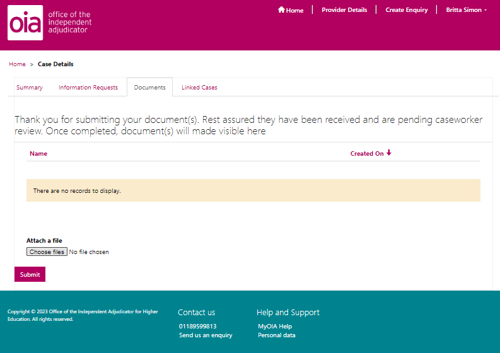
Uploading and viewing documents
To upload a document to a complaint:
- Go into the relevant complaint by selecting the “Case Title” from the “Complaints List”
- Select the “Documents” tab
- Under “Attach a file” select “Choose a file” and then “Submit”
- The document will not appear in the list until it has been reviewed by one of our caseworkers
File size limits
When uploading requested files to a case, there is a 50MB per file limit. Multiple files of up to 50MB each can be uploaded at the same time, but any file over 50MB will result in an upload error for all files being uploaded.
For example, 3 x 45MB files could be uploaded at the same time, but 2 x 5MB files plus 1 x 52MB file would fail.
File name character limits
Files names are limited to 150 characters. Anything over this will fail to upload.
Accepted file types
Only the following file types can be uploaded via the portal:
.bmp, .eml, .doc, .docx, .gif, .htm, .html, .jpeg, .jpg, .mp3, .mp4, .msg, .pdf, .png, .ppt, .pptx, .rtf, .tif, .txt, .xls, .xlsx, .zip.
Files of different types will fail to upload.
PDF “Portfolio” files should not be used when sending information to the OIA. “Portfolio” files cause us compatibility and data management issues when attempting to extract the individual files into a usable and shareable format. This does not affect standard PDF files.
To view documents uploaded to a complaint:
- Select the title of the document in the “Name” column of the “Documents” tab on a complaint. The document will then be downloaded for you to view.
If you want to delete your MyOIA account please contact us and we will do this for you.
There are different types of accounts for providers and the type you have will depend on your role in relation to our Scheme:
- Point of Contact and Point of Contact Delegate accounts can access all information about the provider, including information about complaints and the provider’s membership of our Scheme.
- They can invite other colleagues to create a MyOIA account, including complaint-handling colleagues and staff who handle subscriptions and membership, and can give and remove permissions for other colleagues.
- Subscription contacts can access information about your provider’s membership of our Scheme and subscriptions, but they can’t view information about complaints
- Read-only accounts can see basic information about the provider and may be assigned in some circumstances.
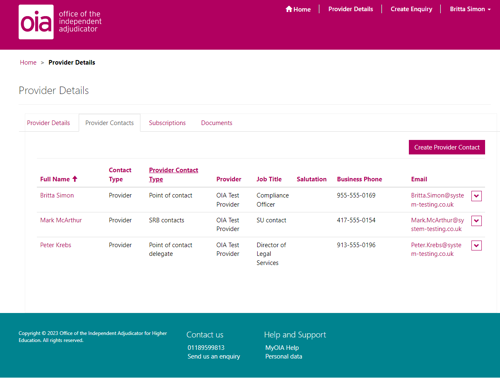
You can see the type of account you and other contacts at you provider have by selecting “Provider details” from the options in the top right-hand corner of the page, then the “Provider contacts” tab.
Add account/contact
To invite a colleague to create a MyOIA account, you must have either a Point of Contact or Point of Contact Delegate account.
To invite someone to create an account or change permission settings, log in to your MyOIA account and:
- Select “Provider Details” from the options in the top right-hand corner of the page
- Select the “Provider Contacts” tab
- Select “Create Provider Contact” and select the type of account the person should have. Your colleague will receive an email asking them to complete the registration process
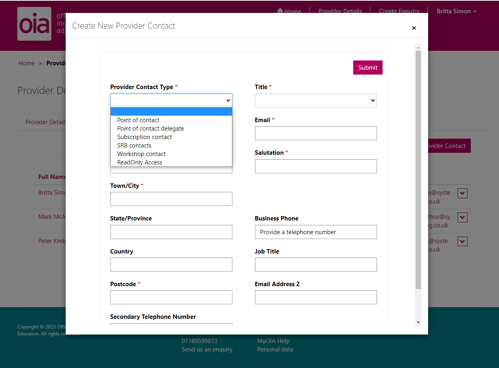
Provide the required details and select “Submit”. Your colleague should then get an email inviting them to create an account, and they will appear in the list on the “Provider Contacts” tab.
Permissions
To change the permissions of a colleague’s who already has an account:
- Select “Provider Details” from the options in the top right-hand corner of the page
- Select the “Provider Contacts” tab
- Select their name from the “Provider Contacts” tab and choose the appropriate option from the drop-down menu under “Provider Contact Type”
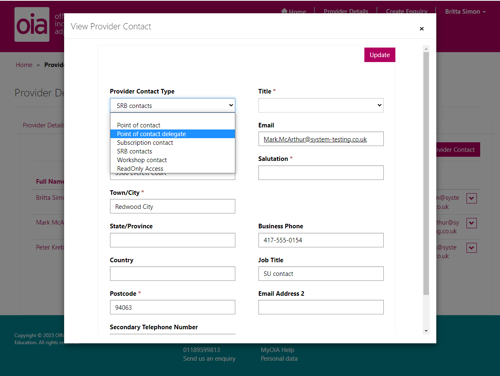
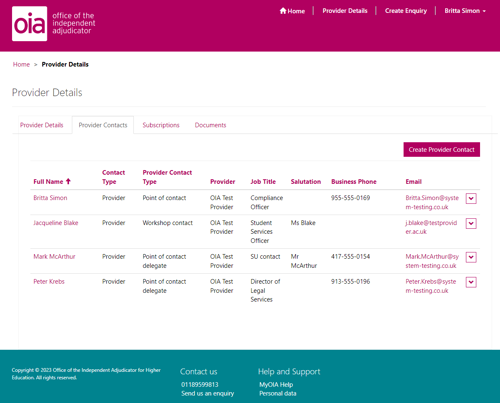
- Select “Update”. The system will update and you will see your colleague’s account type change in the “Provider contact Type” column on the “Provider Contacts” tab
If you are currently a Point of Contact and need to assign this role to someone else you can do this by either:
- Following the instructions above to create an account for the colleague that will assume this role (if they don’t already have a MyOIA account) and selecting “Point of Contact” on the drop-down menu for “Provider Contact Type”
- Following the guidance above to update the account type of a colleague who already has an account, and selecting “Point of Contact” on the drop-down menu for “Provider Contact Type”
- The system will update and you will see your colleague’s account type change in the “Provider contact Type” column on the “Provider Contacts” tab
To make changes to the provider’s contacts:
- Log in to your MyOIA account
- Select “Provider Details” from the options in the top right-hand corner of the page
- Select the “Provider Contacts” tab
- Select the name of the colleague who you are updating.
- Enter the information you would like to change and select the “Update” button in the top right-hand corner of the window.
You can view information about each complaint that we have received about the provider on the Complaints List including when:
- We have received a complaint
- We have allocated a complaint to a case-handler
- We have received correspondence from a student or the provider, and
- We are waiting for information or comments to be sent to us (including the deadline we have set for receiving this information).
View the tracker
To see the tracker:
- Log in to your MyOIA account
- On the Home screen you can see the list of complaints and a very brief summary. You can choose to view either “Active Cases” or “Closed Cases”
- You can also filter the list of complaints by clicking the column headings.

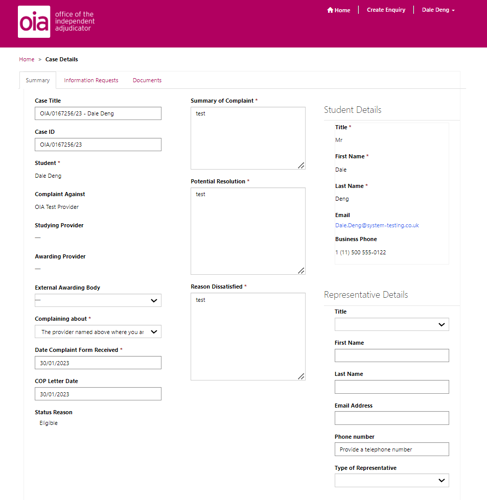
View complaint information
To see the full information about a complaint:
- Select the Case Title of the complaint you want to view
- You can then use the tabs to see a summary of the complaint, as well as information requests, documents and linked cases relating to the complaint.
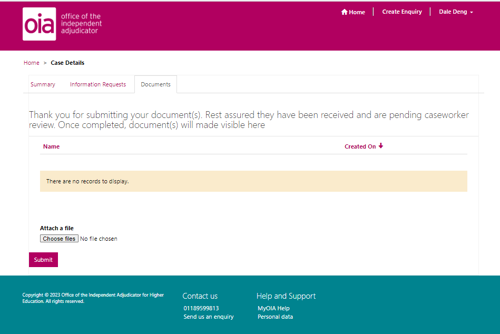
Uploading and viewing documents
To upload a document to a complaint:
- Go into the relevant complaint by selecting the Case Title from the Complaints List
- Select the “Documents” tab
- Under “Attach a file” select “Choose a file” and then “Submit”
- The document will not appear in the list until it has been reviewed by one of our caseworkers
File size limits
When uploading requested files to a case, there is a 50MB per file limit. Multiple files of up to 50MB each can be uploaded at the same time, but any file over 50MB will result in an upload error for all files being uploaded.
For example, 3 x 45MB files could be uploaded at the same time, but 2 x 5MB files plus 1 x 52MB file would fail.
File name character limits
Files names are limited to 150 characters. Anything over this will fail to upload.
Accepted file types
Only the following file types can be uploaded via the portal:
- .bmp
- .eml
- .doc
- .docx
- .gif
- .htm
- .html
- .jpeg
- .jpg
- .mp3
- .mp4
- .msg
- .png
- .ppt
- .pptx
- .rtf
- .tif
- .txt
- .xls
- .xlsx
- .zip.
Files of different types will fail to upload.
PDF “Portfolio” files should not be used when sending information to the OIA. “Portfolio” files cause us compatibility and data management issues when attempting to extract the individual files into a usable and shareable format. This does not affect standard PDF files.
To view documents uploaded to a complaint:
Select the title of the document in the “Name” column of the “Documents” tab on a complaint. The document will then be downloaded for you to view.